
We are a family-owned VW Parts
Company that has been in business
for more than 30 years. We're real
people who know Volkswagens and
drive Volkswagens. Learn More >
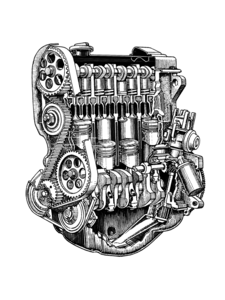
TECH TIP: HOW TO ADJUST VALVES
The clearance between the heel of the cam lobe and the bucket type cam follower is adjustable by means of replaceable adjusting disks (shims).
The adjusting disks are available in twenty-six different thicknesses from 3.00 to 4.25mm. The disks most frequently required in making adjustments fall in the thickness range of 3.55 to 3.80mm. The thickness of each disk is etched on its underside.
You can adjust the valves with the engine hot or with the engine cold. If hot, the coolant temperature should be approximately 35 degree C (95 F) or above, however, the clearance will be different depending on whether the engine is hot or cold.
To adjust the valve clearance:
Remove the eight nuts and the cylinder head cover retaining plates. Then carefully lift off the cylinder head cover and the valve cover gasket. If the gasket is stuck to the cylinder head, use a dull knife to separate the gasket from the head.
Using a wrench on the bolt that is in the center of the crankshaft pulley, hand-turn the crankshaft clockwise until both cam lobes for the No.1 (Right) cylinders are pointing upward. Then, to determine the valve clearance, insert feeler gauges of various thicknesses between the cam lobes and the adjusting disks.
Note: The cylinders are numbered consecutively from the right (curb side) to the left (driver's side) of the engine. For example the No. 4 cylinder is at the end of the engine that is bolted to the flywheel bell housing of the transaxle.
Note: with the engine hot, the intake valve clearance should be between 0.20 and 0.30 mm; exhaust valve clearance should be between 0.40 and 0.50 mm. With the engine cold, the intake valve clearance should be between 0.15 and 0.25 mm; exhaust valve clearance should be between 0.35 and 0.45 mm.
If either the intake or the exhaust valve clearance is incorrect, write down the actual clearance that you have measured. Then depress the cam followers with a special tool (valve adjustment tool) and lift out the adjusting disk(s) with special pliers (shim puck pliers).
Read the thickness that is etched on the underside of the removed disk. (If the number has worn off, check the disk thickness with a micrometer.) Then determine the thickness of the required replacement disk as described in one of the next two steps.
If the measured clearance was less than the specified clearance range for the valve, subtract the measured clearance from the specified maximum clearance. Then subtract the difference from the thickness of the original disk in order to determine the thickness of the required replacement disk. If the computed thickness comes out equal to a standard disk thickness, or if the computed thickness is less than a standard disk thickness, use the next thicker disk.
Note: If the measured clearance was greater than the specified than the specified clearance rage for the valve, subtract the specified maximum clearance from the measured clearance. Then add the difference to the thickness of the original disk in order to determine the thickness of the required replacement disk. If the computed thickness of is equal to a standard disk thickness, or if the computed thickness is less than a standard disk thickness, use the next thicker disk.
- Install the required replacement disk(s) with the etched numbers toward the cam follower. Remove the special cam follower depressing tool. Then recheck the clearance to make sure that it is within the specified range.
- Using a wrench on the bolt that is in the center of the crankshaft, hand-turn the crankshaft 180 degrees clockwise and repeat steps 1 through 7 on the no. 3 cylinder. Hand turn the crankshaft another 180 degrees and adjust the valves of the no. 4 cylinder, and finally, 180 degrees farther to adjust the valves of the No. 2 cylinder.
- Install the cylinder head cover. Torque the bolts to 10Nm (7.5 ft. lb.).
WARNING: While our customers have found this information useful, these articles/links are not from technical publications. Information presented here is to give you a general idea of what to do and how to do it. Auto repair, while fun and economical, can be dangerous. There is no way we can warn you of each and every hazard. How can we tell you that when installing a hub cap, don’t smoke and have a bucket of gas nearby? If you have no common sense, ignore these articles. Otherwise, read the warnings in the front of the Robert Bentley manual before you proceeded to follow any advice given here.
Don’t see what you need?
Call us at 586.757.2300
We have 26,000 VW parts in stock and ready to ship, but only 4,000 of them are listed on-line.
Call us and we can still ship you what you need today.
After hours? Fill out our contact us and we will get back to you within one business day.
Who We Are
Who We Are
We're not just an internet company; we're a family owned bricks-and-mortar store, and a catalog mail-order company that's been in business for over 30 years. We're real people who drive Volkswagens and know Volkswagens. When you call us, you talk to a real person who's changed out the injection pump on a Rabbit Diesel, or replaced the pushrod tubes on a Beetle. You'll never get routed to some call center in India!
We have a 10,000 square foot warehouse filled with VW parts located in Warren, Michigan. We don't have all of our parts listed online yet, but give us a call at 586-757-2300 and we'll ship you what you need.