
We are a family-owned VW Parts
Company that has been in business
for more than 30 years. We're real
people who know Volkswagens and
drive Volkswagens. Learn More >
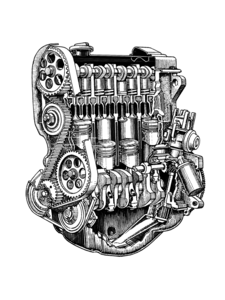
TECH TIP: FOR REMOVING AND INSTALLING CYLINDER HEAD
The cylinder head can be removed without removing the engine from the car and without removing the camshaft or other valve gear prior to cylinder head removal. To remove cylinder head and manifolds:
- Remove the radiator cap. Place a receptacle beneath the radiator for catching the draining coolant. Then remove the drain plug from the bottom of the radiator and allow the coolant to drain.CAUTION: Never drain the coolant while the engine is hot, doing this could warp the engine block or the cylinder head.
- Remove the camshaft drive belt.
- Remove the air cleaner, and then disconnect all of the hoses, cables and wires that are connected to the carburetor and the intake manifold. Only on certain cars sold in California, disconnect the air lines from the air injection connections on the exhaust manifold.
- Remove the nuts that hold the exhaust pipe to the exhaust manifold. Then remove the nuts and bolts that hold the exhaust manifold and the intake manifold (on carbureted engines) or the intake air distributor (on fuel injection engines) on the cylinder head. Then remove them from the cylinder head as a unit. NOTE:Six nuts hold the exhaust pipe onto the exhaust manifold. Nuts, bolts and metal brackets join the exhaust manifold and intake manifold or intake air distributor.
- Remove the upper alternator mounting bolt. Then unbolt the alternator V-belt adjusting bracket from the cylinder head and remove the bracket.
- Disconnect all coolant hoses from the cylinder head. Disconnect the wire for the temperature gauge.
- Disconnect the spark plug cables from the spark plugs. Disconnect the high-tension cable from the coil at terminal 4. Then remove the distributor cap complete with the spark plug cables and the high-tension cable.
- Remove the spark plugs.
- Remove the eight bolts and cylinder head cover retaining plates. Then carefully lift off the cylinder head cover and its gasket. If the gasket is stuck to the cylinder head, use a dull knife to separate the gasket form the head.
- Beginning at the outer ends of the cylinder head and working toward the center from both directions, use a hex-shaped driver to remove the eight socket head cylinder head bolts.
- Lift the cylinder head off the engine block. If the head is stuck, insert two wooden hammer handles in the outermost exhaust ports, then using a tilting motion, pull the head free.
To Install:
- Thoroughly clean the cylinder head. CAUTION: Do not use a metal scraper or a power driven wire brush to clean the combustion chambers or gasket sealing surface. Doing this can gouge the aluminum, which could cause the head gasket to leak or leave scratches in the combustion chambers that could become "hot spots." Instead, use solvent to soften combustion chamber deposits, dried sealer and material from the old head gasket. Then remove this foreign matter with a wooden or plastic scraper.
- Thoroughly clean the gasket sealing surface of the cylinder block. Then clean the threads in the head bolt holes. NOTE: To keep dire, stuff clean rag into the cylinder bores and seals all water and oil passages with tape. After you have cleaned the sealing surface of the block, use a thread cutting tap or thread chaser to clean the bolt holes. It is extremely important that all debris be removed from the bottoms of the holes after you have cleaned the threads.
- Check the cylinder head for warping. To do this lay a straightedge lengthwise across the sealing surface of the head. You should not be able to insert a 0.13-mm feeler gauge between the sealing surface and the straightedge at any point. Repeat the check with the straightedge placed diagonally across the surface in both directions. NOTE: If a 0.13mm feeler gauge can be inserted at any point, either replace the cylinder head or take it to an automotive machine shop where the head can be milled to obtain a true surface. NOTE: A 0.10mm feeler gauge inserted between the straightedge and cylinder head sealing surface, which is the maximum allowable distortion. So if a 0.13mm feeler gauge can be inserted, the head must be replaced or milled to a true surface.
- Using the procedure you used for the head, check the engine block for warping. Warped blocks can also be milled but the engine must be removed and completely disassembled beforehand.
- Using a thread-cutting die, clean the cylinder heads and threads. Do not use a power driven wire brush, which could distort the threads. Replace damaged or distorted bolts. Then coat the bolt threads and head bolt washers with anti seize compound.
- Install a new cylinder head gasket. Place two 200mm long, 9mm diameter wooden dowels in two of the outermost head bolts holes to hold the gasket on the engine block and to serve as guides when you install the cylinder head. CAUTION: Never reinstall a cylinder head gasket that has previously been compressed by tightening the cylinder head bolts. Once compressed, such gaskets lose their resilience and will not produce a reliable seal if reused. NOTE: Cylinder head gasket installed on block. The word OBEN (top) identifies the top surface of the gasket, which must be upward.
- Using the two dowels as a guide, carefully lower the cylinder head onto the new cylinder head gasket and the engine block. Then immediately install, but do not tighten, several head bolts and washers. With the cylinder head thus supported, remove the dowels and loosely install the remaining head bolts and washers.
- Torque the 12-point polygon socket head cylinder head bolts to 4.0 Nm (29 ft. lb.) in the sequence of top row being 1-5 (tighten in order 10,4,2,6,9 and bottom row being 6-10 (tighten in order 7,5, 1,3,9). Go over the sequence a second time; torque the bolts to 6.0 Nm (43ft.lb.), then a third time, torque the bolts to 7.5 Nm (54ft.lb.). Go over the sequence one more time, tightening each bolt by precisely one quarter (1/4) turn. NOTE: The new type cylinder head bolts, with 11 mm 12 point sockets in their heads, should be installed in place of the 10mm hexagon socket bolts used in early models. Replace all ten bolts. The new type bolts, part NO. 049 103 385, make it unnecessary to re-torque the bolts after 1000 mi. (1500km) or at any other servicing interval.
- Install the remaining engine parts. Use a new gasket when you install the cylinder head cover and torque the bolts to 1.0 Nm (7ft.lb.). Install new gasket for the manifolds, then install the manifolds and torque the nuts and bolts to 2.5 Nm (18ft.lb.). Reconnect the hose cables and wires to the inductions systems. Fill the cooling system.
- Start the engine. When it has warmed up to the specified temperature, adjust the idle speed.
- On all engines, check the valve clearances and if necessary adjust the clearances.
- Install the cylinder head cover. Use a new gasket if the old gasket is hardened or damaged.
Disassembling and Assembling Cylinder Head: You should not completely disassemble the cylinder head in one continuous operation. Instead, disassemble the head in stages, following the sequence given here, so that you can make various checks and measurements at each stage of disassembly. By doing this you will be able to determine which parts can be reused and which parts require reconditioning or replacement.
WARNING: While our customers have found this information useful, these articles/links are not from technical publications. Information presented here is to give you a general idea of what to do and how to do it. Auto repair, while fun and economical, can be dangerous. There is no way we can warn you of each and every hazard. How can we tell you that when installing a hub cap, don't smoke and have a bucket of gas nearby? If you have no common sense, ignore these articles. Otherwise, read the warnings in the front of the Robert Bentley manual before you proceeded to follow any advice given here.
Don’t see what you need?
Call us at 586.757.2300
We have 26,000 VW parts in stock and ready to ship, but only 4,000 of them are listed on-line.
Call us and we can still ship you what you need today.
After hours? Fill out our contact us and we will get back to you within one business day.
Who We Are
Who We Are
We're not just an internet company; we're a family owned bricks-and-mortar store, and a catalog mail-order company that's been in business for over 30 years. We're real people who drive Volkswagens and know Volkswagens. When you call us, you talk to a real person who's changed out the injection pump on a Rabbit Diesel, or replaced the pushrod tubes on a Beetle. You'll never get routed to some call center in India!
We have a 10,000 square foot warehouse filled with VW parts located in Warren, Michigan. We don't have all of our parts listed online yet, but give us a call at 586-757-2300 and we'll ship you what you need.